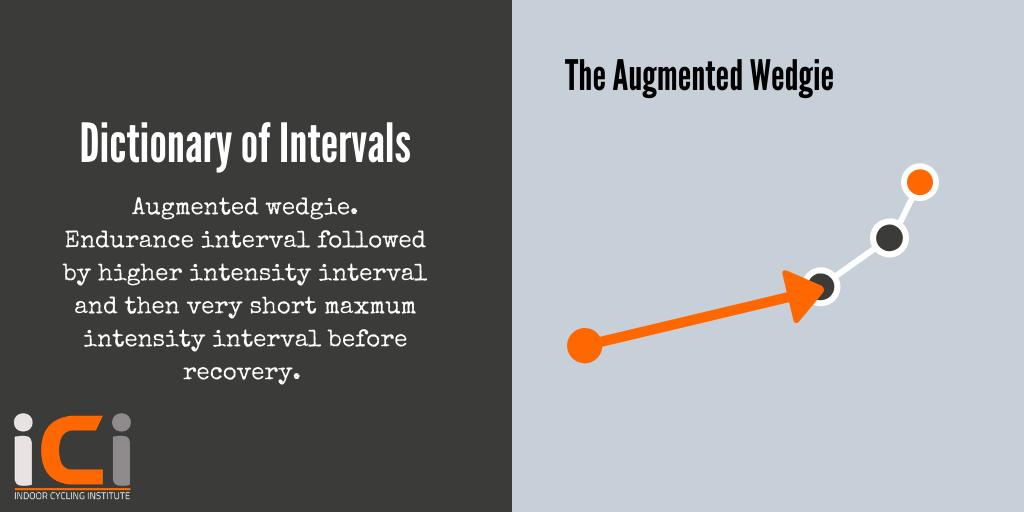
 Indoor Cycling Instructor Dictionary of Intervals - augmented wedgiePosition or interval: The augmented wedgie is an interval. What it is: Like the ordinary wedgie, you're starting at a lower intensity before finishing with an attack (either standing attack or a sprint) - but this time there's an intermediate section where you increase the intensity before the final attack. Cadence: You choose the cadence of the components. Make sure it's safe and effective. Intensity: You can decide how intense you want to make the first longer part of the interval, this is usual done in the seat; the middle part is also seated, and an increased intensity, usually the same cadence. The final attack is either a standing attack or a sprint and so the effort will be maximal. Length: You can make the first part as long as you like - is it for power or for endurance? The final part is going to be using the CP energy system and therefore this intense effort can only be sustained for several seconds - 10-15 seconds is perfect. The middle part is heading up to or passing your lactate threshold. When to use: use at any point in the session after warming up, it really depends on the trajectory of the profile. It's a great one to finish with. What it does: Great for building explosive power and simulating a competitive finish. Key teaching points:
If you want to be an excellent indoor cycling instructor, then we want to help ensure you get there. Click below to book your spot now, or to get further information.
0 Comments
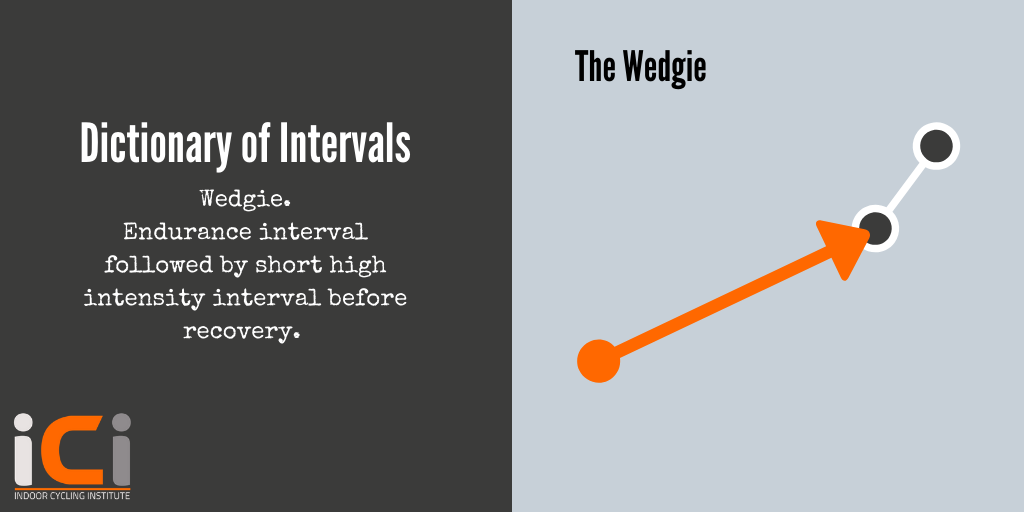 Indoor Cycling Instructor Dictionary of Intervals - wedgiePosition or interval: The wedgie is an interval. You have a longer component to start with, usually aerobic, and then finish off with a max intensity interval such as a standing attack or a sprint. Cadence: You choose the cadence of the two components. Make sure it's safe and effective. Intensity: You can decide how intense you want to make the first longer part of the interval; the second part is either a standing attack or a sprint and so the effort will be maximal. Length: You can make the first part as long as you like - is it for power or for endurance? The second part is going to be using the CP energy system and therefore this intense effort can only be sustained for several seconds - 10-15 seconds is perfect. When to use: use at any point in the session after warming up, it really depends on the trajectory of the profile. What it does: Great for building explosive power and simulating a sprint finish. Key teaching points:
If you want to be an excellent indoor cycling instructor, then we want to help ensure you get there. Click below to book your spot now, or to get further information.
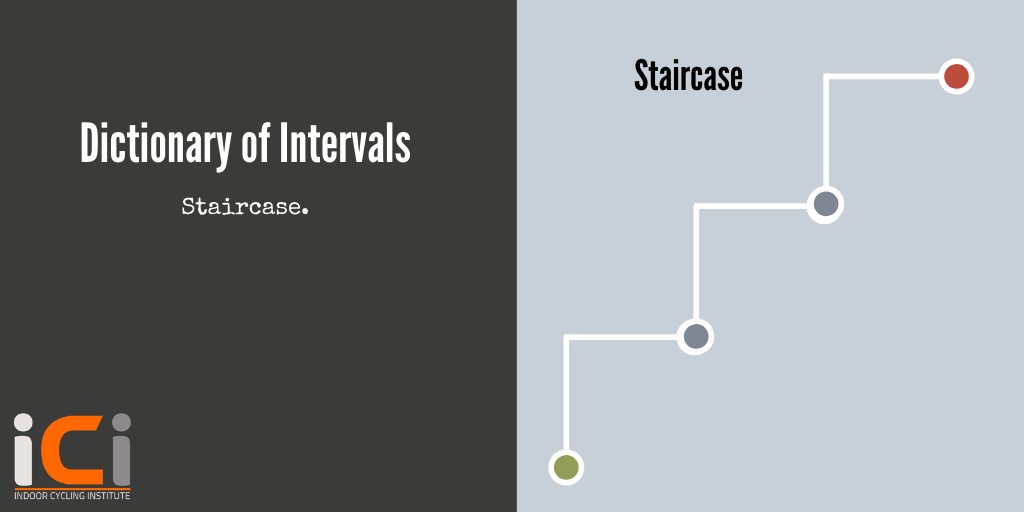 Indoor Cycling Instructor Dictionary of Intervals: StaircasePosition or interval: The staircase is an interval. Cadence: You choose the cadence. The idea is that you will be keeping the cadence the same right the way through. Intensity: The intensity builds as you go through the interval. You decide how hard it is to start with. You can also stipulate that riders stay in the aerobic zone if you're aiming for fat-burning or a lower intensity class. Length: Can be as long as you like. Each step will be the same length, and goes on in total for at least a minute but usually a lot llonger! When to use: use at any point in the session, although often it's better, due to its intensity, to put it close to the end of the session. What it does: Great for building anaerobic capacity (at higher intensities), and muscular endurance. Key teaching points:
If you want to be an excellent indoor cycling instructor, then we want to help ensure you get there. Click below to book your spot now, or to get further information.
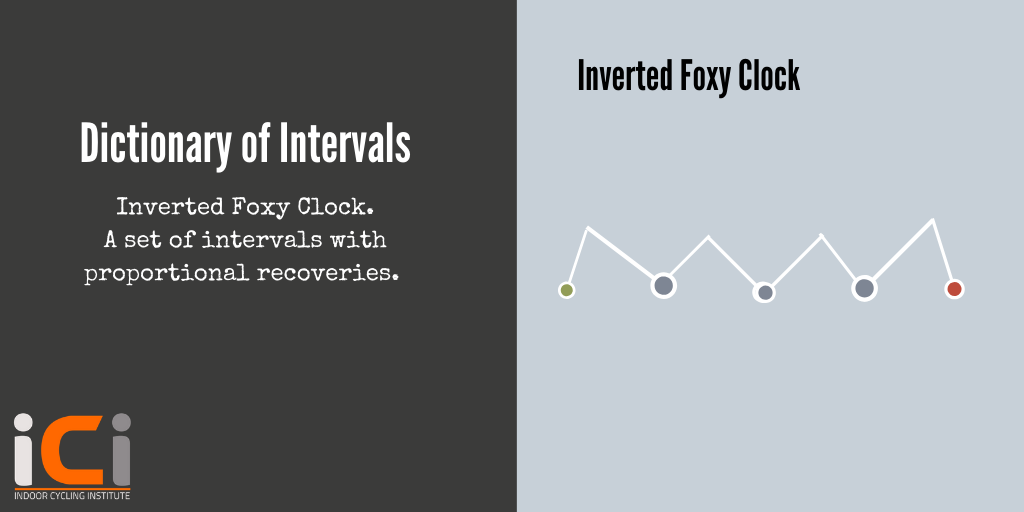 Indoor Cycling Instructor Dictionary of Intervals: Inverted Foxy ClockPosition or interval: The inverted foxy clock is an interval. What it is: A set of intervals which increase in length with decreasing recoveries. Cadence: Select the cadence and you can stick with this cadence right the way through Intensity: The aim is to maximise the intensity for thelength of each interval. The more intense the interval, the shorter it is, and the longer its corresponding recovery is. Length: You can fit a foxy clock inside a few minutes (interval/recovery): 10/50, 20/40 30/30, 40/20, 50/10. You may have fewer intervals: 15/45, 30/30, 45/15. When to use: anywhere outside the warmup. You can use it as a way of building strength as the intervals get longer, the challenge is to maintain the intensity of the initial shorter intervals What it does: Builds strength and endurance, at higher intensities with a delayed recovery. Key teaching points:
If you want to be an excellent indoor cycling instructor, then we want to help ensure you get there. Click below to book your spot now, or to get further information.
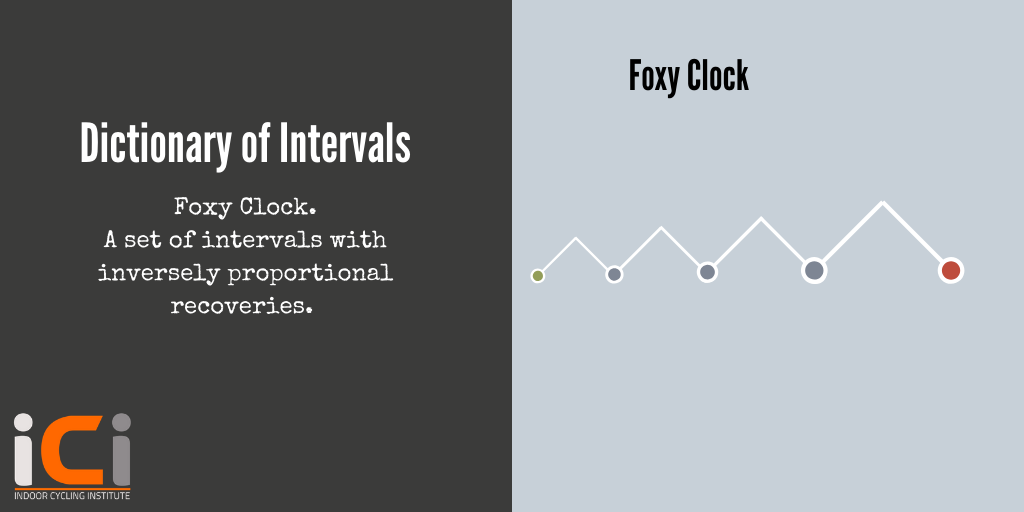 Indoor Cycling Instructor Dictionary of Intervals: Foxy ClockPosition or interval: The foxy clock is an interval. What it is: A set of intervals which increase in length with corresponding increasing recoveries - they may also decrease back again. Cadence: Select the cadence and you can stick with this cadence right the way through Intensity: The aim is to maintain what's possible in the shorter intervals in the longer intervals. You decide what the intensity is. Length: You can fit a foxy clock inside a few minutes (interval/recovery): 10, 10, 20, 20, 30, 30, 40, 40, 50, 50. You may have fewer intervals: 15, 15, 30, 30, 45, 45, 60, 60. When to use: anywhere outside the warmup. You can use it as a way of building confidence and endurance at high intensities, or use it as a cadence drill by changing the cadence as you go. What it does: Builds explosive power, works CP system, builds strength and endurance, at higher intensities with a delayed recovery. Key teaching points:
If you want to be an excellent indoor cycling instructor, then we want to help ensure you get there. Click below to book your spot now, or to get further information.
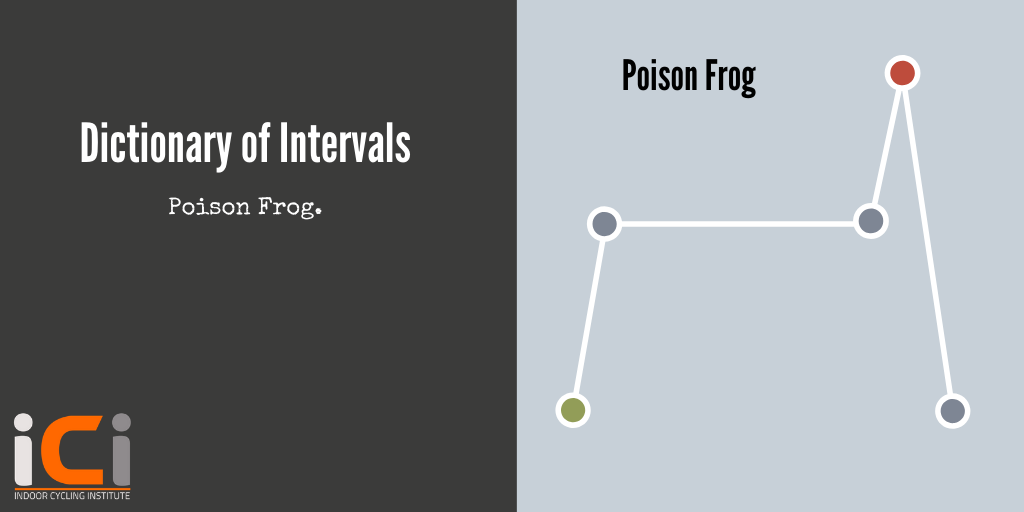 Indoor Cycling Instructor Dictionary of Intervals: Poison FrogPosition or interval: The poison frog is an interval. What it is: A maximal intensity interval (sprint or standing attack) followed by 2 minutes at lower intensity and finish with a second maximal intensity interval. Cadence: You select the cadence for the middle stage. Cadence for the two maximal intensity stages will be governed by what is possible for the rider at the required level of intensity. Intensity: The two maximal intensity intervals are precisely that - the middle section can be tempo/aerobic or low anaerobic depending on training effect you want. Length: Usually the poison frog lasts about 2.5 mins with a 15 second max intensity interval bracketing a 2 minute ride. You can make the middle section longer if you prefer. When to use: use it in sets of 3-6. Allow appropriate recovery in between - you'll need at least 2 minutes of recovery between each one. If riders don't feel they need the full 2 minutes to recover, they need to increase the intensity particularly of the max intensity stages. What it does: Builds explosive power, works CP system, builds strength and endurance, at higher intensities with a delayed recovery. Key teaching points:
Find out more about what the Indoor Cycling Institute can offer you here:
 Indoor Cycling Instructor Dictionary of Intervals: Bobble HatsPosition or interval: The bobble hat is an interval. What it is: A series of stages of increasing intensity, before gradually decreasing the intensity. Cadence: You select the cadence. You have a choice with cadence - you can either stick with the same cadence right the way through, and increase the challenge by increasing resistance, or you can keep the resistance the same, but try to increase the cadence as you go through the stages. Intensity: The intensity increases as you head through the stages of the climb. you may start pretty easy, and end moderately challenging, or you may start at a harder intensity and end really hard. The 'bobble' of the hat is a high intensity interval - a standing attack or a sprint, and then the intensity decreases gradually, delaying the recovery. Length: A bobble hat will last for minutes in total - it's up to you how long you make it; could just be 4-5 minutes, or you could make it longer, 10 minutes or more. You also get to decide how long each stage within the climb is. We recommend an absolute minimum of 30 seconds for each stage, with the high intensity interval at the top 15 seconds, although 1 minute works very well for the stages excluding the high intensity one. For very long climbs, spreading the stages out to 2 minutes each is incredibly challenging both mentally and physically. With each stage, you'll be adding challenge by either increasing resistance, or cadence, or both. You can split the bobble hat - use it whole for maximum challenge, but you can use the principle of the progressive climb leading to a maximal interval or the other principle of maximal interval followed by delayed recovery and gradually decreasing steps of intensity towards recovery. When to use: This is a very challenging interval, and therefore it's best used in the second half of a session - but due to the decreasing intensity towards recovery, it's best not to use it as the final challenge of the session as you'll want all riders to finish on a rather than a decrease. What it does: Builds strength and endurance, at higher intensities. Key teaching points:
If you want to be an excellent indoor cycling instructor, then we want to help ensure you get there. Click below to book your spot now, or to get further information.
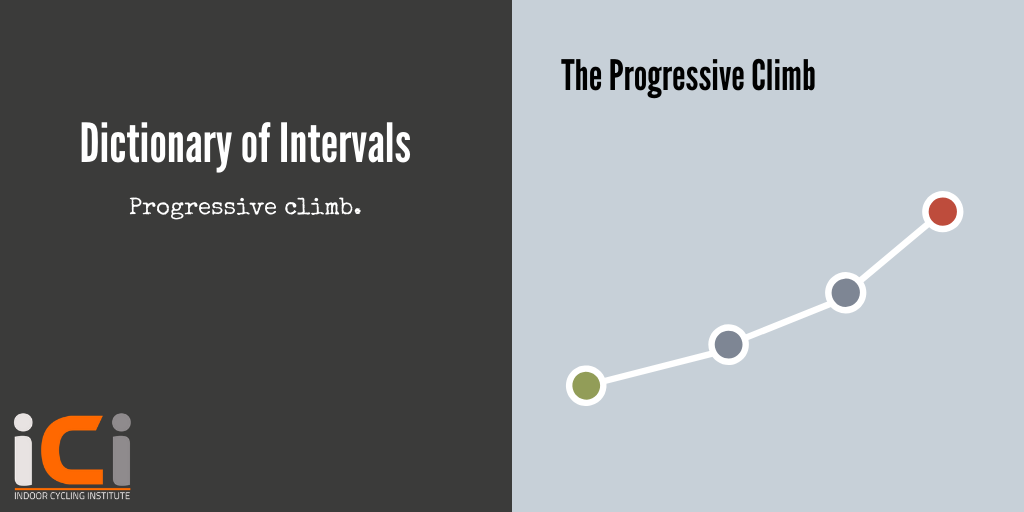 Indoor Cycling Instructor Dictionary of Intervals - progressive climbPosition or interval: The progressive climb is an interval. What it is: A longer climb (either seated or standing, or a combination of the two positions) that gets progressively harder. Cadence: The cadence is between 60-85rpm. You'll give your riders a 10 or 5 rpm range. You have a choice with cadence - you can either stick with the same cadence right the way through, and increase the challenge by increasing resistance, or you can keep the resistance the same, but try to increase the cadence as you go through the stages. Intensity: The intensity increases as you head through the stages of the climb. you may start pretty easy, and end moderately challenging, or you may start at a harder intensity and end really hard. Length: A progressive climb will last for minutes - it's up to you how long you make it; could just be 3 minutes, or you could make it longer, 8 minutes or more. You also get to decide how long each stage within the climb is. We recommend an absolute minimum of 30 seconds, although 1 minute works very well. For very long climbs, spreading the stages out to 2 minutes each is incredibly challenging both mentally and physically. With each stage, you'll be adding challenge by either increasing resistance, or cadence, or both. When to use: Use it anywhere outside the warm up. You can create two of these and 'bookend' your session with them. f you use two, they might be identical, or you may tweak resistance in one and cadence in the other. Or have a seated one and a standing one. A progressive climb is an excellent climb to finish a class on as it creates a marvellous climax. What it does: Builds strength and endurance, and when used appropriately can build aerobic or anaerobic fitness. Key teaching points:
If you want to be an excellent indoor cycling instructor, then we want to help ensure you get there. Click below to book your spot now, or to get further information.
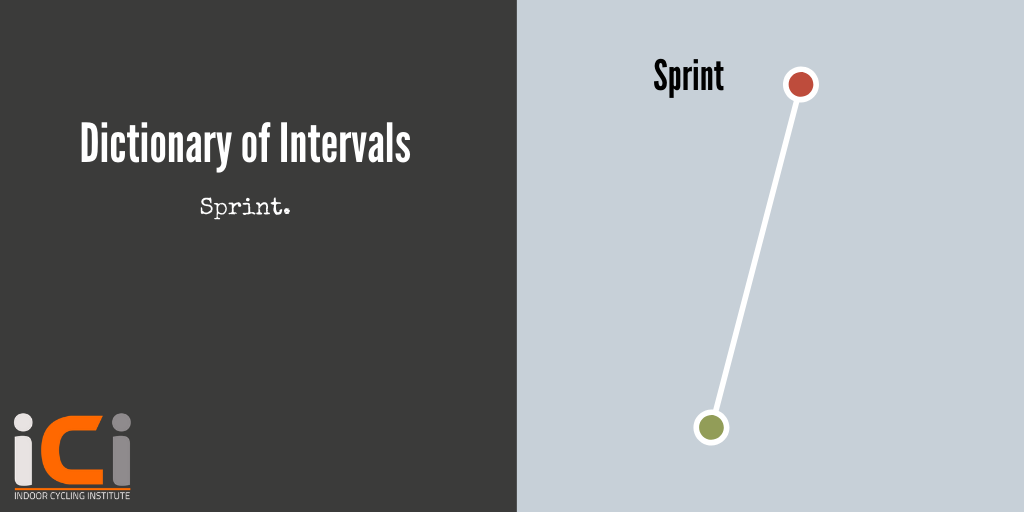 Indoor Cycling Instructor Dictionary of Intervals: sprintPosition or interval: The sprint is a position. What it is: A maximal intensity interval in the saddle. Cadence: The cadence is usually between 85-110rpm. Intensity: The sprint is maximal intensity. Length: Because the sprint requires the CP energy system, this intense effort can only be sustained for several seconds - 10-15 seconds is perfect. When to use: only when riders are properly warmed up - and best in the second half of the session. Use it in sets of 3-6. What it does: Trains the CP system and builds power. Key teaching points:
If you want to be an excellent indoor cycling instructor, then we want to help ensure you get there. Click below to book your spot now, or to get further information.
 Indoor Cycling Instructor Dictionary of Intervals: standing climbPosition or interval: The standing climb is a position. What it is: Riding with a heavier level of resistance out of the saddle. Cadence: The cadence is between 65-85rpm. You'll give your riders a 10 or 5rpm range. Intensity: At lower cadences, the standing climb can become very intense, for a less challenging intensity, ride at the higher end of the climbing cadence range. Length: It is up to you and what training effect you want riders to get from the seated climb, and this will determine the cadence, intensity, and therefore the optimum length of the interval. When to use: Use it anywhere outside the warm up. You can use it on its own, in a set of similar or increasing length or intensity climbs, combine it with sprints or standing attacks, or mix it with seated climbs. Lots of possibilities here. What it does: Builds strength and endurance, and when used appropriately can build aerobic or anaerobic fitness. Key teaching points:
If you want to be an excellent indoor cycling instructor, then we want to help ensure you get there. Click below to book your spot now, or to get further information.
 Indoor Cycling Instructor Dictionary of Intervals - seated climbPosition or interval: The seated climb is a position. What it is: Riding with a heavier level of resistance in the saddle. Cadence: The cadence is between 60-85rpm. You'll give your riders a 10 or 5 rpm range. Intensity: At lower cadences, the seated climb can become very intense, for a less challenging intensity, ride at the higher end of the climbing cadence range. Length: It is up to you and what training effect you want riders to get from the seated climb, and this will determine the cadence, intensity, and therefore the optimum length of the interval. When to use: Use it anywhere outside the warm up. You can use it on its own, in a set of similar or increasing length or intensity climbs, combine it with sprints or standing attacks, or mix it with standing climbs. Lots of possibilities here. What it does: Builds strength and endurance, and when used appropriately can buld aerobic or anaerobic fitness. Key teaching points:
If you want to be an excellent indoor cycling instructor, then we want to help ensure you get there. Click below to book your spot now, or to get further information.
 Indoor Cycling Instructor Dictionary of Intervals: Standing AttackPosition or interval: The standing attack is a position.
What it is: A maximal intensity interval out of the saddle. Cadence: The cadence is usually between 75-85rpm. Intensity: The standing attack is maximal intensity. Length: Because the standing attack requires the CP energy system, this intense effort can only be sustained for several seconds - 10-15 seconds is perfect. When to use: only when riders are properly warmed up - and best in the second half of the session. Use it in sets of 3-6. What it does: Trains the CP system and builds power. Key teaching points:
 Indoor Cycling Instructor Dictionary of Intervals: timetrialPosition or interval: The timetrial is an indoor cycling interval. What it is: In a road race a timetrial is an individual or team race around a set route. The fastest individual or team wins. In the indoor cycling studio, you can replicate this high intensity interval by setting the time and asking riders to maintain their highest possible power for the duration. Really challenging - the shorter it is, the more power each rider will be able to push, but the longer it is, the more mentally taxing it is! Cadence: Cadence can be as fast as 110rpm, but certainly no more. It's unlikely that cadence would be any slower than 80rpm. Intensity: Timetrial is a maximal, high-intensity interval. Length: Can be several minutes long depending on the purpose of the interval. When to use: use at any point in the session, although often it's better, due to its intensity, to put it close to the end of the session. What it does: Great for building anaerobic capacity, and muscular endurance. Key teaching points:
If you want to be an excellent indoor cycling instructor, then we want to help ensure you get there. Click below to book your spot now, or to get further information.
 Indoor Cycling Instructor Dictionary of Intervals: flat roadPosition or interval: The flat road is really a riding position rather than an interval. What it is: This is the basic seated position. Cadence: Cadence can be as fast as 110rpm, but certainly no more. It's unlikely that cadence would be any slower than 70rpm. Intensity: This can be added as a low-intensity, recovery type interval, it can be used as active recovery, as well as a medium-intensity indoor cycling interval. Length: Can be anything up to several minutes long depending on the purpose of the interval. When to use: the seated flat, or flat road can be considered your neutral riding position. It is this position you'll be coming back to as your warm up, cool down, and recover in between intervals. If you're coaching technique, you'll want to get all riders riding effectively in this position first. Also use this position when you want a longer interval that is sub-maximal and therefore not as intense as a timetrial. What it does: Great for building aerobic capacity, cardiovascular endurance. Completed at different cadences it can build coordination. Key teaching points:
If you want to be an excellent indoor cycling instructor, then we want to help ensure you get there. Click below to book your spot now, or to get further information.
|


Categories
All
|
Quick links
Get started
|
Find what's right for you
|
Courses
|
Further learning
|
More
|
The Indoor Cycling Institute provides the most comprehensive and up to date indoor cycling instructor training; providing entry-level courses, and further education to raise the standard of instructors.
© 2014-2024 Protheorem Ltd
The Indoor Cycling Institute is owned and operated by Protheorem Ltd Registered in England & Wales, Company number 12812092
The Indoor Cycling Institute is owned and operated by Protheorem Ltd Registered in England & Wales, Company number 12812092